Black Forest Cupcakes: How to Make Them Moist
Have you ever taken that first hopeful bite of a Black Forest cupcake only to feel your excitement crumble into disappointment—along with the dry cake in your mouth? We’ve all been there! Those beautiful chocolate-cherry dreams promising moist decadence but delivering something closer to chocolate sawdust. Well, I’m about to change your Black Forest destiny forever. After years of kitchen experiments (and yes, some spectacular failures), I’ve cracked the code to creating cupcakes so moist they should come with a warning label.
Overview
What makes my Black Forest cupcakes recipe worth bookmarking? These aren’t your average chocolate cupcakes with cherries tossed on top—they’re little masterpieces of moisture and flavor that capture the essence of the traditional German cake in handheld form.
Time Required: About an hour from start to finish (30 minutes of hands-on time and 30 minutes baking/cooling)
Difficulty Level: I’d call this one “confident beginner.” If you can follow directions and aren’t afraid to get your hands a little messy, you’ve got this!
The magic lies in my triple-moisture method: oil instead of butter in the batter, a secret sour cream addition, and a glorious cherry syrup soak that infuses every bite with juicy cherry goodness. These techniques work together to create cupcakes that stay miraculously moist for days (though they rarely last that long in my house!).
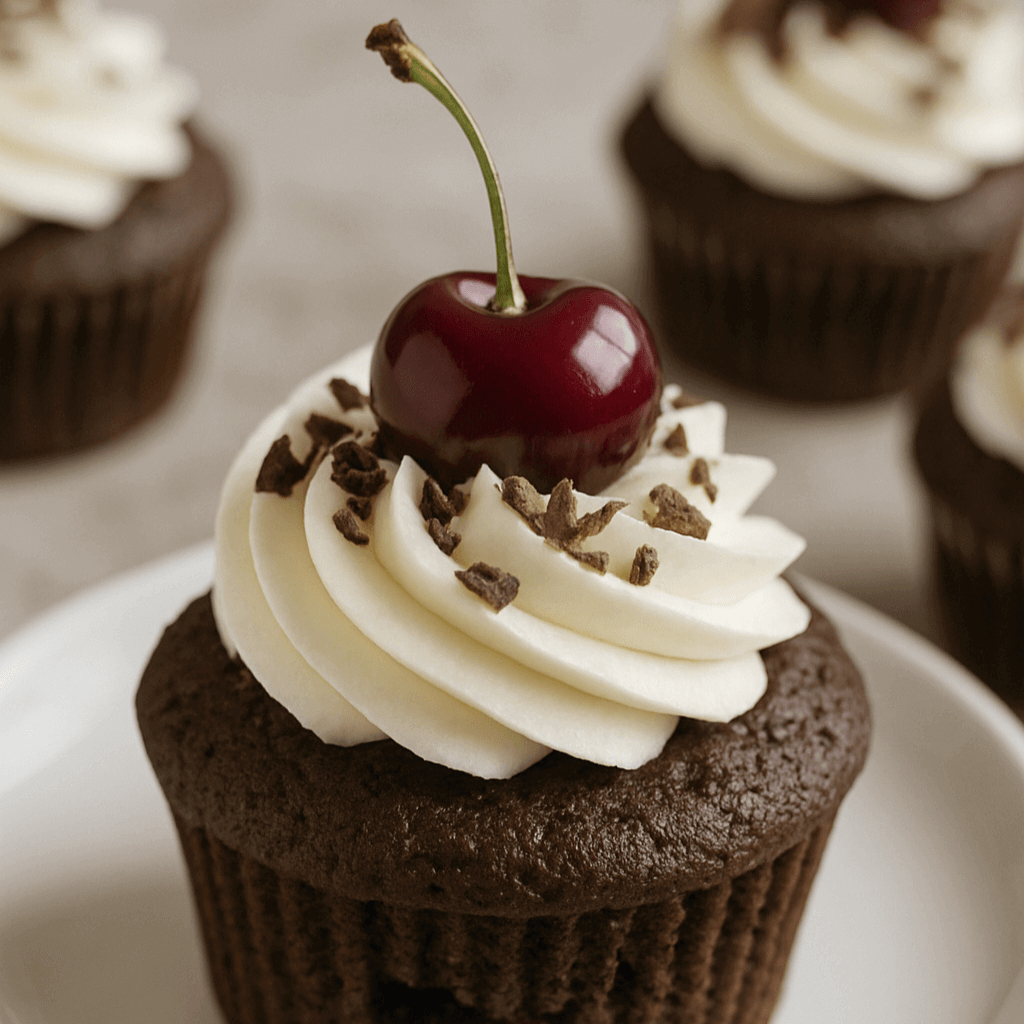
Table of Contents
Essential Ingredients
For the Can’t-Believe-It’s-So-Moist Chocolate Cupcakes:
- All-purpose flour – The backbone of our cupcakes (1¾ cups)
- Unsweetened cocoa powder – I swear by Dutch-processed for that deep chocolate intensity (¾ cup)
- Granulated sugar – Sweet basis for moisture magic (1½ cups)
- Baking powder and baking soda – The dynamic duo that gives our cupcakes their perfect rise (1½ teaspoons each)
- Salt – The flavor amplifier no one talks about but everyone needs (½ teaspoon)
- Eggs – Structure-builders at their finest (2 large)
- Sour cream – My not-so-secret moisture weapon! (½ cup)
- Vegetable oil – Keeps cupcakes moist way longer than butter ever could (½ cup)
- Vanilla extract – Because chocolate deserves a best friend (2 teaspoons)
- Hot coffee – The unsung hero that intensifies chocolate flavor while adding moisture (¾ cup)
For the Cherry Jewels:
- Cherries – Canned dark sweet cherries are my year-round go-to, but fresh are heaven in summer (2 cups)
- Cherry juice – (½ cup juice )
- Sugar – Just enough to bring out the cherries’ natural sweetness (¼ cup)
- Cornstarch – The magical powder that transforms juice into luscious filling (1 tablespoon)
For the Cloud-Like Topping:
- Heavy whipping cream – The colder, the better for perfect peaks (2 cups)
- Powdered sugar – Sweetens while stabilizing our whipped cream architecture (½ cup)
- Vanilla extract – The finishing touch for dream-worthy cream (1 teaspoon)
Step-by-Step Instructions
The Perfect Chocolate Canvas:
- Preheat with purpose – Set that oven to 350°F (175°C) and line your cupcake pan with pretty liners (they’re not just for looks—they help retain moisture!).
- Dry ingredient harmony – In your mixing bowl, whisk together the flour, cocoa powder, sugar, baking powder, baking soda, and salt until they become one beautiful chocolate-colored mix.
- Wet ingredient magic – In a separate bowl, whisk those eggs until slightly frothy, then add your moisture makers: sour cream, oil, and vanilla. Mix until smooth.
- The coffee trick – Brew that coffee extra hot and add it to your wet ingredients, whisking quickly. The heat blooms the cocoa flavor—trust me on this one!
- The gentle marriage – Pour your wet ingredients into the dry mix and fold together with a spatula. Here’s where most people go wrong—mix JUST until combined. I count to 10 while stirring slowly and then stop, even if I see a few small flour streaks. Overmixing is moisture’s enemy!
- Fill with restraint – Use an ice cream scoop (my secret weapon for uniform cupcakes) to fill each liner about ⅔ full. Room to grow means perfect domes.
- The waiting game – Bake for 18-20 minutes, but—and this is crucial—start checking at 16 minutes. When a toothpick comes out with a few moist crumbs (not wet batter), they’re done. Even one minute too long in the oven can dry them out!
- Cool with strategy – Leave in the pan for exactly 5 minutes (set a timer!), then transfer to a cooling rack. This prevents the dreaded soggy-bottom syndrome while preserving top moisture.
Cherry Filling That Dreams Are Made Of:
- Cherry prep – If using canned cherries, drain but SAVE that precious juice. Using fresh? Pit them and slice in half.
- Flavor concentration – In a saucepan, combine your cherries, juice, and sugar. Warm over medium heat until the sugar dissolves and the mixture starts to simmer.
- The thickening magic – Mix cornstarch with 2 tablespoons cold water in a small bowl until it looks like milk. Drizzle this into your simmering cherry mixture while stirring constantly.
- Patience pays off – Cook for about 2 minutes more, watching as the filling transforms from cloudy to gloriously glossy. You’ll know it’s ready when it coats the back of a spoon.
- Cool completely – Resist the urge to use it warm! Hot filling equals soggy cupcakes.
Whipped Cream Worth Swooning Over:
- The cold truth – Pop your mixing bowl and beaters in the freezer for 15 minutes. This isn’t fussy baking—it’s science! Cold equipment = better whipped cream.
- Start slow – Pour the cold cream into your chilled bowl and beat on low speed until small bubbles form.
- Build momentum – Increase to medium speed and watch as the cream starts to thicken.
- The sweet addition – Once soft peaks form (when the cream curls gently when you lift the beaters), gradually add powdered sugar and vanilla while continuing to beat.
- The finish line – Beat just until stiff peaks form—when you lift the beaters, the cream should stand tall with just a slight curl at the tip. Overbeat and you’ll have sweet butter!
My Never-Fail Tips:
- Room temperature eggs aren’t optional – They blend better and create more volume
- The spoon-and-level flour method – Never scoop directly with a measuring cup (that packs in too much flour)
- The toothpick test lies sometimes – A few moist crumbs are perfect; completely clean means they’re overbaked
- If your batter looks too thick – Add 1-2 tablespoons milk to reach a smooth, pourable consistency
Assembly: Where Magic Happens
Now comes my favorite part—transforming simple cupcakes into Black Forest masterpieces!
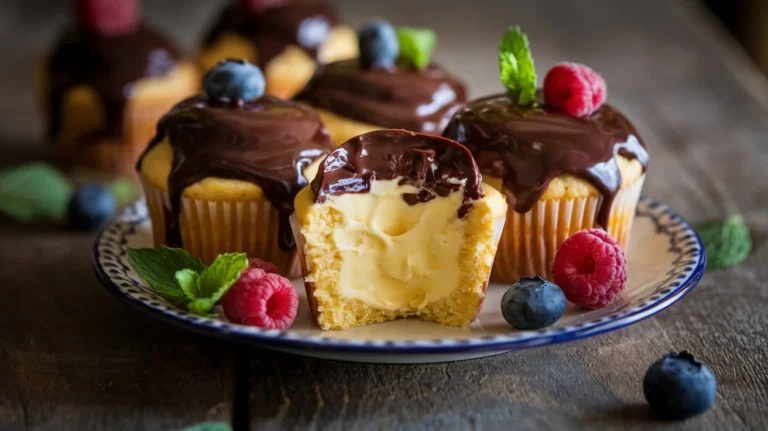
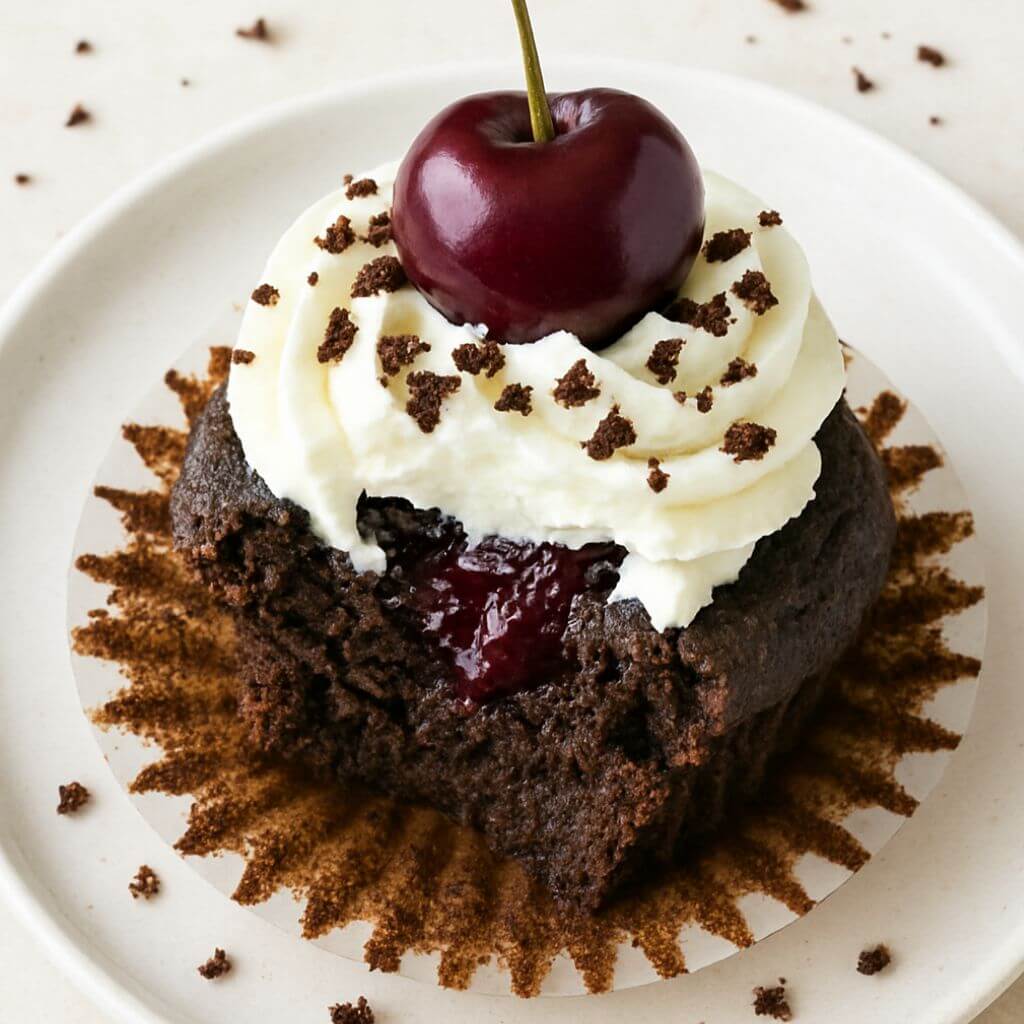
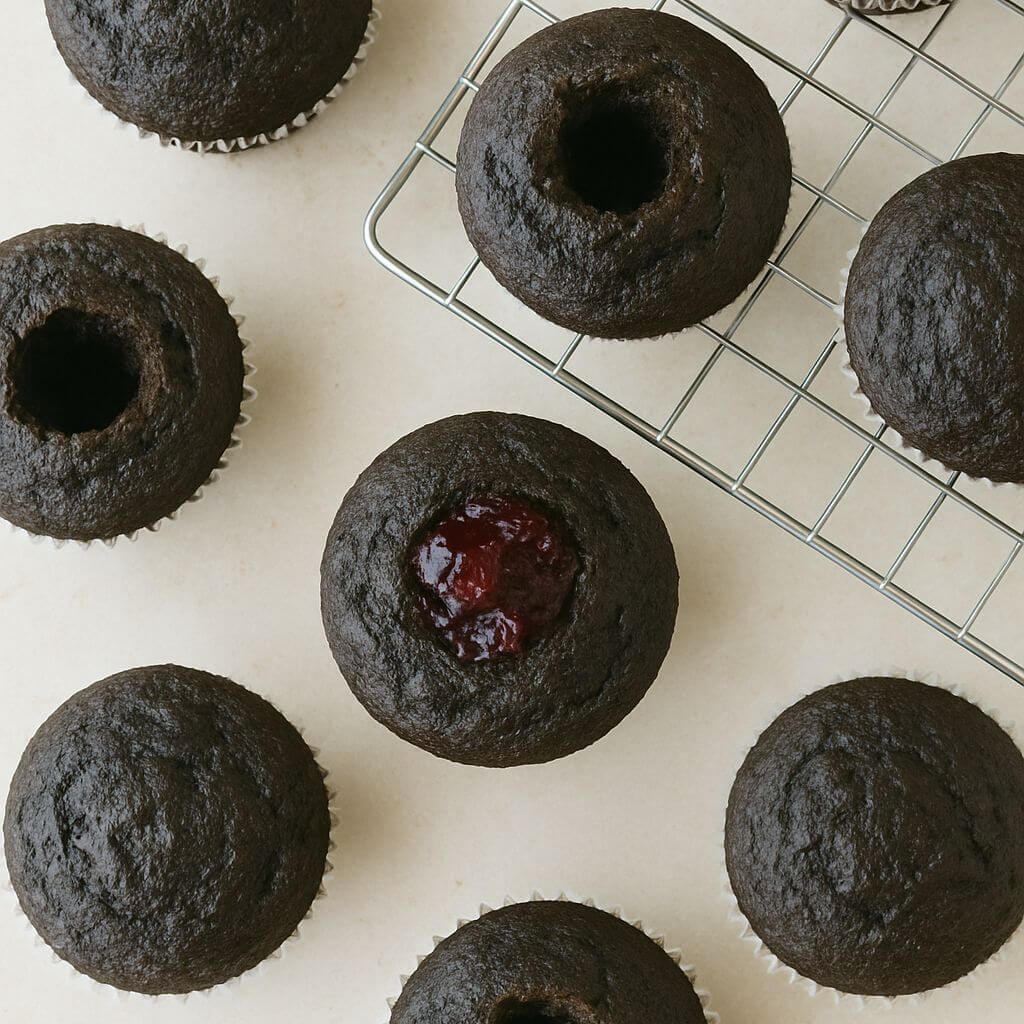
- Create hidden treasure caves – Once cupcakes are completely cool, use an apple corer or small knife to remove a cylinder from the center of each cupcake, about 1-inch deep. Don’t toss these cake plugs—baker’s treats!
- The moisture infusion – Here’s my game-changing trick: use a small pastry brush to dab cherry juice onto the inside walls of each cavity AND brush a little on top of each cupcake. This extra step makes all the difference between good and magnificent cupcakes.
- Jewel filling – Spoon your glossy cherry filling into each cavity, allowing a few cherry pieces to peek out the top like hidden gems.
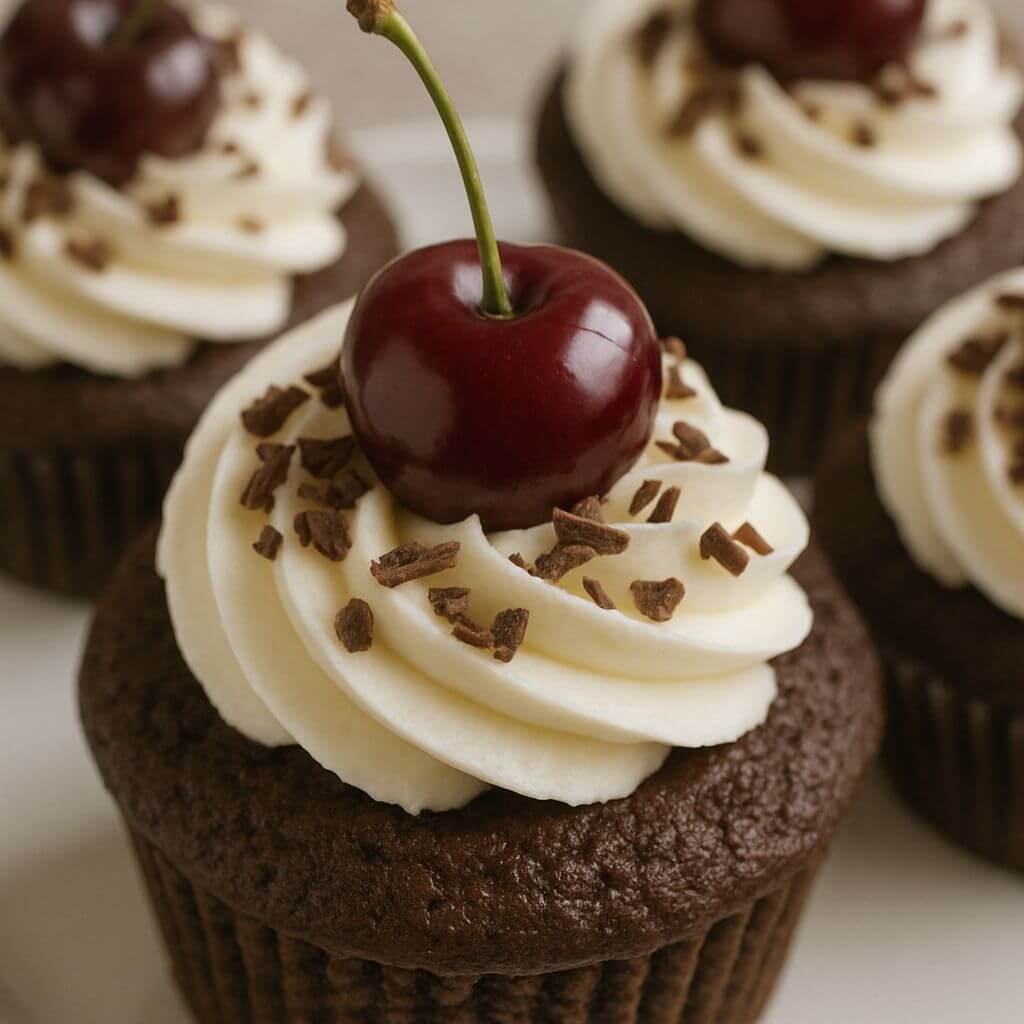
- Cream cloud creation – Transfer your whipped cream to a piping bag fitted with a large star tip (Wilton 1M is my ride-or-die). Pipe glorious swirls on each cupcake, starting from the outside and working your way in.
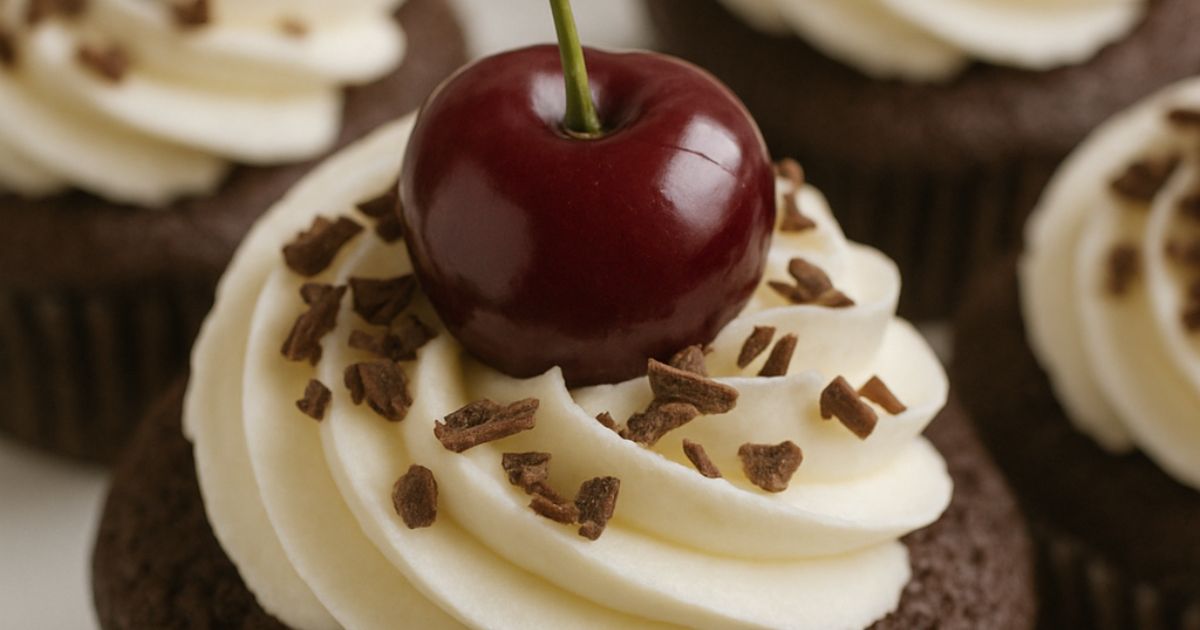
- The finishing touches – Crown each cupcake with a perfect cherry and add chocolate curls or shavings. I use a vegetable peeler on a slightly warm chocolate bar for effortless curls.
Presentation that Wows:
- The height factor – Pipe cream high for drama—these aren’t subtle cupcakes!
- The drizzle effect – A little chocolate sauce making its way down the side creates dessert envy
- The dusting trick – A light shower of cocoa powder through a small sieve adds professional bakery vibes
- The serving platter matters – Dark plates make these cupcakes pop (I use my grandmother’s vintage black cake stand for maximum impact)
Storage and Make-Ahead Tips
Let’s be honest—these rarely last long enough to worry about storage, but life happens:
- Naked cupcakes (unfilled, unfrosted) stay wonderfully moist for 2 days in an airtight container at room temperature. My grandmother taught me the bread slice trick: add a piece of sandwich bread to the container to keep everything ultra-moist.
- The filling can be your best friend for make-ahead prep—it keeps beautifully in the fridge for up to 3 days and actually develops better flavor overnight.
- Once assembled, these beauties need refrigeration because of the cream. They’ll keep for 2 days, though the whipped cream starts to soften after 24 hours.
My Moisture-Preservation Secrets:
- Individual wrap wins – After cooling, wrap each unfilled cupcake in plastic wrap, then freeze in a container. They defrost to almost-baked freshness!
- The syrup salvation – If your cupcakes seem even slightly dry, make extra cherry syrup (juice + sugar, simmered until slightly thickened) and brush generously before filling
- The microwave miracle – If refrigerated cupcakes seem firm, let them sit at room temperature for 20 minutes before serving, or give them a 10-second microwave burst (remove the paper liner first!)
Recipe Variations: Because Rules Are Meant for Breaking
After making these countless times, I’ve developed some fun twists:
- White Forest Wonder: Swap chocolate cupcakes for vanilla ones—the vibrant red cherries against white cake and cream create a stunning visual (and taste) contrast.
- Jar of Joy: Layer crumbled cupcake pieces, cherry filling, and whipped cream in mason jars for portable Black Forest cupcake treat that’s perfect for picnics.
- Mini Marvels: Make bite-sized Black Forest cupcakes for parties using a mini muffin tin. Reduce baking time to 10-12 minutes and use a piping tip to create the perfect tiny center holes.
- The Showstopper: Transform this recipe into a Black Forest trifle by cubing the cupcakes, layering them with filling and cream in a glass bowl, then finishing with chocolate shavings. It’s my go-to when I need to feed a crowd!
- The Virtuous Version: Use whole wheat pastry flour, reduce sugar by ¼ cup, and top with Greek yogurt sweetened with just a touch of honey for a breakfast-worthy spin. I call these my “Monday Morning Motivators.”
Conclusion
Creating truly moist Black Forest cupcakes isn’t just about following a recipe—it’s about understanding the little details that make all the difference. The joy of watching someone take that first bite and seeing their eyes widen with surprise and delight makes every step worthwhile.
These cupcakes have been my signature bring-along to gatherings for years, earning me the nickname “Cherry Queen” among friends. Whether you follow my recipe exactly or put your own spin on it, remember that baking is part science, part art, and completely magical when shared with others.
So heat up that oven, embrace the cherry-chocolate goodness, and prepare to accept compliments graciously—you’re about to become famous for your impossibly moist Black Forest cupcakes!
Frequently Asked Questions
Q: I followed the recipe but my cupcakes still turned out dry. What went wrong? A: Kitchen detective time! The three most common culprits are: your oven runs hot (invest in an oven thermometer!), the flour was overmeasured (try weighing instead of cup-measuring), or—the most common sin—overbaking. Even one minute too long can dry out a perfect cupcake. Remember: a few moist crumbs on your toothpick means they’re done!
Q: Fresh cherries are out of season. What’s my best option? A: Frozen cherries are my go-to backup! Thaw them completely, drain (saving the juice), and proceed as normal. They actually release more juice than fresh, so you might need an extra teaspoon of cornstarch in your filling.
Q: My whipped cream deflated before the party even started! Help! A: Been there! For stabilized whipped cream that holds its shape for days, dissolve 1 teaspoon of unflavored gelatin in 1 tablespoon of warm water, let it cool slightly, then drizzle it into your cream during the soft-peak stage of whipping. It’s my foolproof party trick!
Q: Can I make these for a bake sale where they’ll sit out for hours? A: Absolutely! Just swap the whipped cream for a more stable frosting—try my cream cheese and mascarpone blend (8oz each, beaten with ½ cup powdered sugar and 1 teaspoon vanilla). It has the same cloud-like texture but stays perfect for hours.
Q: My family doesn’t like cherries. Is there a Black Forest cupcake alternative? A: While technically not “Black Forest” anymore, these cupcakes are amazing with raspberry filling instead! Use the same method but substitute raspberries for cherries. I call them “Dark Forest cupcakes” and they disappear just as quickly.
Q: Can I turn this recipe into a full Black Forest cake? A: You sure can! Double the cupcake recipe and bake in two 9-inch round pans for about 30-35 minutes. Split each cake horizontally to create four layers, then fill and assemble just like the traditional cake. The cupcake forest becomes a magnificent Black Forest!
Q: What makes these Black Forest cupcakes easy enough for beginners? A: Unlike traditional Black Forest cake with its multiple layers and potential structural issues, these cupcakes are forgiving. Even if your centers aren’t perfectly cut or your piping isn’t bakery-worthy, they’ll still taste amazing and look impressive!
Q: The coffee in the recipe concerns me. Will my kids taste it? A: Not at all! Coffee magically enhances chocolate flavor without adding coffee taste. It’s like chocolate’s secret amplifier. But if you’re still concerned, hot water works perfectly fine—just add ¼ teaspoon of espresso powder if you have it.